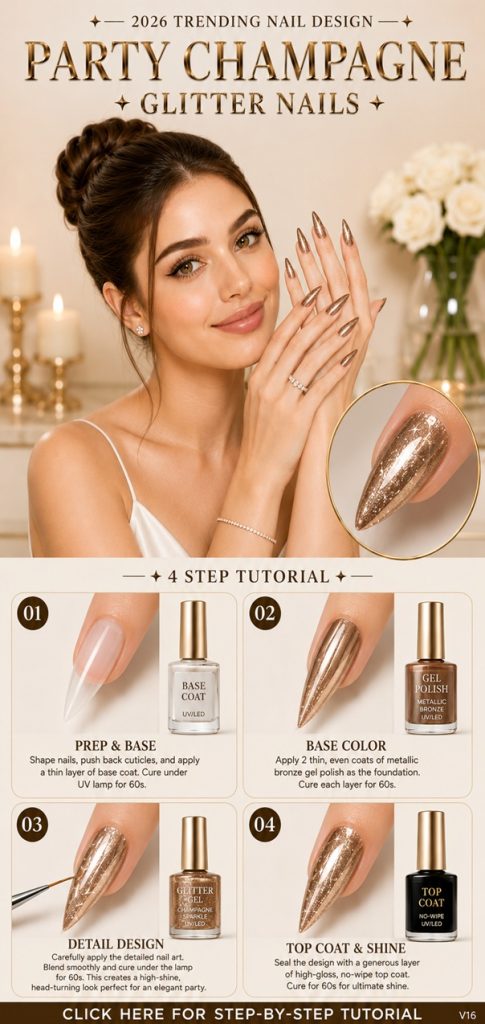
Party Champagne Glitter Nails are one of the most elegant nail trends of 2026. This luxurious design combines a metallic champagne-bronze shade with sparkling glitter accents to create a sophisticated and glamorous appearance. The design is perfect for weddings, engagement parties, formal dinners, holiday celebrations, and special events. The long almond or stiletto nail shape enhances the reflective metallic finish, making the manicure look professional and salon-worthy.
Materials Needed
Before starting, prepare the following items:
- Nail file
- Cuticle pusher
- Nail buffer
- Nail cleanser or rubbing alcohol
- Lint-free wipes
- UV/LED lamp
- Base coat
- Metallic champagne or bronze gel polish
- Champagne glitter gel polish
- Fine nail art brush
- High-gloss no-wipe top coat
- Cuticle oil
Step 1: Prepare the Nails
Proper preparation is essential for a long-lasting manicure.
Shape the Nails
File the nails into a long almond or stiletto shape. Keep both sides even and symmetrical. Smooth all edges to prevent snagging.
Prepare the Cuticles
Gently push back the cuticles using a cuticle pusher. Remove any loose dead skin around the nail plate.
Buff the Surface
Lightly buff the top of each nail to remove natural shine. This helps the gel products adhere better.
Clean the Nails
Wipe each nail with nail cleanser or rubbing alcohol to remove dust, oil, and debris.
Apply Base Coat
Apply a thin, even layer of base coat over the entire nail surface. Be sure to seal the free edge of the nail.
Cure
Place the nails under a UV/LED lamp and cure for 60 seconds.
Step 2: Apply the Champagne Metallic Base
This layer creates the luxurious champagne effect that forms the foundation of the design.
First Coat
Apply a thin coat of metallic champagne gel polish. Start in the center of the nail and work outward toward the sides.
Cure
Cure under the UV/LED lamp for 60 seconds.
Second Coat
Apply a second thin coat for full opacity and a richer metallic appearance.
Cure Again
Cure for another 60 seconds.
Result
At this stage, the nails should have a smooth, reflective champagne-bronze finish with a luxurious metallic shine.
Step 3: Create the Glitter Design
The glitter details add depth, sparkle, and elegance to the manicure.
Apply Glitter Gel
Place a small amount of champagne glitter gel onto a palette or foil surface.
Use a Fine Brush
Dip a thin nail art brush into the glitter gel.
Create Sparkling Streaks
Paint delicate glitter lines from the cuticle area toward the tip. Vary the thickness slightly to create dimension and movement.
Blend the Glitter
Softly blend the glitter so that it transitions naturally into the metallic base color.
Concentrate Sparkle
Place slightly more glitter in the center area of the nail to create a reflective highlight effect.
Cure
Cure under the lamp for 60 seconds.
Result
The nails should now display elegant champagne sparkle over the metallic bronze background.
Step 4: Apply the Top Coat
The final step protects the design and creates a high-gloss finish.
Apply Top Coat
Apply a generous but even layer of no-wipe top coat over the entire nail.
Seal the Edges
Make sure the free edge is sealed to help prevent chipping.
Cure
Cure under the UV/LED lamp for 60 seconds.
Finish
Apply a small amount of cuticle oil around each nail and gently massage it into the skin.
Professional Tips for a Luxury Finish
Keep Layers Thin
Thin layers cure more evenly and create a smoother finish.
Use Quality Glitter
Fine glitter creates a sophisticated appearance, while chunky glitter can look less refined.
Maintain Symmetry
Keep glitter placement similar on all nails for a balanced look.
Avoid Overloading
Too much glitter can hide the metallic base and reduce the elegant effect.
Common Mistakes to Avoid
Applying Thick Gel Layers
Thick layers may wrinkle or cure unevenly.
Skipping Nail Preparation
Improper preparation can cause lifting and reduced wear time.
Using Excess Glitter
Overusing glitter can make the manicure appear cluttered.
Forgetting Edge Sealing
Unsealed edges may chip prematurely.
How Long Does This Design Last?
When applied correctly:
- Gel version: 2–4 weeks
- Professional application: Up to 4 weeks
- Regular polish version: Approximately 5–7 days
Durability depends on nail care habits and daily activities.
Aftercare Tips
- Apply cuticle oil daily.
- Wear gloves when cleaning.
- Avoid using nails as tools.
- Keep hands moisturized.
- Avoid prolonged exposure to harsh chemicals.
Final Result
The completed Party Champagne Glitter Nails feature a luxurious metallic champagne base enhanced by elegant glitter detailing and a brilliant high-gloss finish. The design is timeless, sophisticated, and suitable for both formal and festive occasions. With proper application and care, this manicure delivers a glamorous salon-quality appearance that remains one of the most fashionable nail trends of 2026.